How to design a simple vintage logo from start to finish

Watch the design process step-by-step
Sometimes it’s easier to observe the design process first-hand. Here is a quick tutorial where I show you how I design this simple vintage logo design using the steps outlined above.
Sketch rough concepts on paper
Start by sketching out a few ideas for your logo on paper. These don’t have to be detailed drawings. Instead, it’s about getting your ideas out quickly. In this early stage, you can explore different layout options. If you have more than one word, try all words in one line as well as stacked on top of each other.
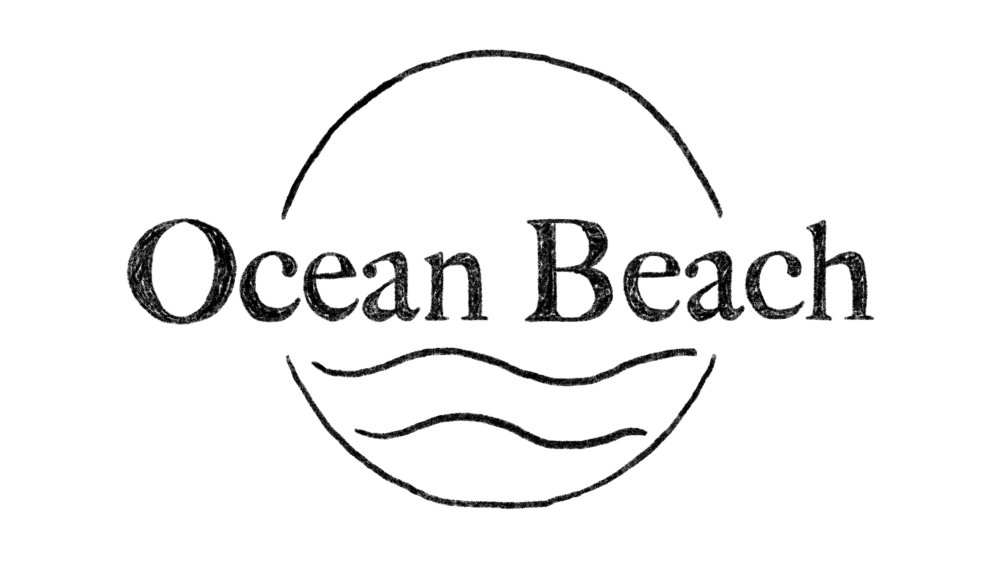
For this logo, I knew I wanted to include elements of a landscape. I played with the idea of sandwiching the words Ocean Beach between a visual representation of the ocean and sky.

Pair with typography
Next, head into Illustrator or your favorite vector program to explore typeface pairings. You may already have an idea in mind but still take the time to try out different styles, including serif and san serifs. Try all caps, all lowercase, upper and lowercase.
In this example, I chose Big Caslon Medium, an elegant serif typeface with beautiful details.

Trying out different typefaces in Adobe Illustrator
Adding a hand-drawn touch
I didn’t want this logo to have a super modern feel to it with sharp edges. I wanted to add a hand-lettered spirit. To do this, I exported a jpg of the logo text and opened it in Procreate on my iPad Pro.
Reduce the opacity of this layer, then add another on top. I traced each letter and filled in with the Technical Pencil brush. I also added simple shapes for the landscape, a half circle for the sky, and wavy organic lines for the ocean.

Tracing the design in Procreate
Tracing the design in Procreate
Create a vector version
Procreate is a raster-based software and since I’ll need the logo as a vector file, I used Image Trace to quickly vectorized. You can play around with the setting here to get the effect you’re going with but I wanted to preserve the imperfect edges created in the sketch in Procreate.

Using Image Trace in Adobe Illustrator
Expand, select, and delete the white background so you have a clean vector shape with no background.

Image Trace result from Adobe Illustrator
Clean up shapes and anchor points
Live Trace is known for creating hundreds of anchor points and messy vector shapes. Use the Shape Builder and Pathfinder tools to combine shapes. Clean up by removing anchor points, the smoother the lines the better.

Shape Builder Tool in Adobe Illustrator

Pathfinder panel in Adobe Illustrator
Choose a color palette
Search for color palettes on Pinterest relating to your theme. I searched for vintage color palettes and similar results until I found a few to try out.

Color palette combinations
Try to stick to 1–2 colors for the logo. A good rule of thumb is your logo should always work in black and white. After exploring a few options, I realized this logo looked best with the words Ocean Beach in a blue while the landscape is in vintage orange-red.
Show your logo in context
When you’re done with creating the logo, go the extra mile by mocking it up to see how it will look on other applications.
For this example, I wanted to test the logo on a photo of a beach. Once I was satisfied with the composition, I added a layer of grain to the entire image in Photoshop to accentuate the vintage feel I aimed for.

Final logo design for Ocean Beach